MatriX v2 released

We are pleased to announce the stable releases of MatriX 2. More about the changes in the v2 version can be found in this blog post

Instead of installers we will use NuGet only for all future MatriX releases. You can find all MatriX NuGet packages here

Sample codes can be found in the Git repository here

All our customers with active support & maintenance can of course upgrade to MatriX 2 for free. Updating existing code bases to MatriX 2 should only take a few minutes. We highly suggest the update because there are many improvements in the MatriX 2 core, and also many new features on our roadmap.

MatriX JS XMPP library in beta now

We are pleased to announce our new JavaScript XMPP library MatriX JS which is available for beta now.

MatriX JS is build with Microsoft’s TypeScript. The software design is very similar to our popular MatriX .NET XMPP SDK. TypeScript allowed us to port lots of existing source code, logic and patterns from our MatriX C# library to JavaScript. MatriX JS is also based on LinQ and LinQ to XML. This will make it very easy for our existing customers to port existing code bases to the web or cross platform HTML/JS applications.

Currently BOSH and websockets are supported as transport layers. Node.js and tcp sockets are coming later.

MatriX JS will be licensed under a Creative Commons Attribution-NonCommercial 4.0 International (CC BY-NC 4.0) license.

Contact us to join the MatriX JS beta

MatriX v2 pre release

The first version of MatriX was released in February 2009. Now 6 years later we announce MatriX v2 pre release.

Over the last six years we released all new features and improvements always immediately to our customers, without making major changes in the version number. There have never been any breaking changes.

MatriX v2 has many major improvements in the core, but we also have done some minor changes in the Api. Most of the Api changes are related to Enum names only. Many of them were never compatible with the c# naming conventions.

They have been there because some of the supported .NET platforms were not able to parse the values case-insensitive, and there were no other ways to do this without using endless IF or SWITCH statements on all platforms.
Also some of the code is still left from the very first .NET version of our XMPP components in 2002, using .NET 1.0 and C# 1.0. In the very early days of c# many people were using Java, C or C++ conventions for the new c# language.

public enum MessageType
{  
    Normal,   
    Error,
    Chat,
    GroupChat,
    Headline
}

public enum MessageType
{
    normal,
    error,
    chat, 
    groupchat,
    headline
}

Updating even huge codebases to v2.0 should be very easy and take only some minutes.

With 2.0 we will also separate the NuGet packages by platform. This will allow us publishing NuGet packages much easier and more often. There is still lots of platform specific code in each MatriX edition which does not allow us to work on all of them in parallel.

Right now only builds for teh Full .NET Framework 3.5, 4.0 and 4.5 are available. All other platforms will be published in the next days.

Of course all MatriX licenses keys with Support&Maintenance are valid for v2 as well.

When you find any issues with the pre release please report them directly by Email to us, or use our forums.

Secure Gmail Authentication with X-OAUTH2 SASL

In July 2014 Google has introduced the “More Secure Gmail Authentication feature”.
When Access for less secure apps is set to disabled then Google does not allow login over SASL PLAIN anymore (even on TLS).

During authentication Google replies with the not-authorized error. And they will notify you by email that access to an insecure application was denied.

CLIENT: <auth mechanism="PLAIN" xmlns="urn:ietf:params:xml:ns:xmpp-sasl">AUTH DATA</auth>
SERVER: <failure xmlns="urn:ietf:params:xml:ns:xmpp-sasl">
  <not-authorized />
</failure>

When access for less secure apps is disabled you have to login with the X-OAUTH2 SASL mechanism the Gmail XMPP server offers. Here is a small tutorial how to achieve this with MatriX.

1) API Project

In order to access the Google API you have to setup a project in the Google API Console which provides you the Access credentials. Once you have created your API project you can request your credentials which include the Client Id and Client Secret. During the creation process of the app project we selected “native application”.

2) Request an Access Token

To authenticate with OAuth 2.0 we need to get our Access Token. The OAuth 2.0 is documented at the Google pages under the following 2 links:

There are also several .NET libraries available, e.g DotNetOpenAuth or Google APIs Client Library.

We are not going to use a third party library for now, because this help us also to understand the whole XAuth authentication flow.

We create a new form and put a Webbrowser control on it. When the form loads we have ro navigate to a Url which includes;

  • Client Id of our API project
  • A redirect Uri, we use this urn:ietf:wg:oauth:2.0:oob
  • scopes:
    • https://www.googleapis.com/auth/googletalk
      (required for XMPP authentication)
    • https://www.googleapis.com/auth/userinfo.email
      (optional, we can use this t get the username/email address of the user)

When our form with the webbrowser loads we navigate to this Url with teh following code:

const string CLIENT_SECRET  = "XXXXXXXYYYYYYYYYYYYZZZZZZZZZ";
const string CLIENT_ID      = "yyyyyyyyyyyyy-xxxxxxxxxxxxxxxxx.apps.googleusercontent.com";

private static Uri GetAutenticationUri()
{
    var postData = new List<string>
    {
        "client_id=" + CLIENT_ID,
        "redirect_uri=urn:ietf:wg:oauth:2.0:oob",
        "scope=https://www.googleapis.com/auth/googletalk https://www.googleapis.com/auth/userinfo.email",
        "response_type=code"
    };

    return new Uri("https://accounts.google.com/o/oauth2/auth" + "?" + string.Join("&", postData.ToArray()));
}


private void Form_Load(object sender, EventArgs e)
{
  // navigate to the Uri when the form loads
  webBrowser1.Url = GetAutenticationUri();
}

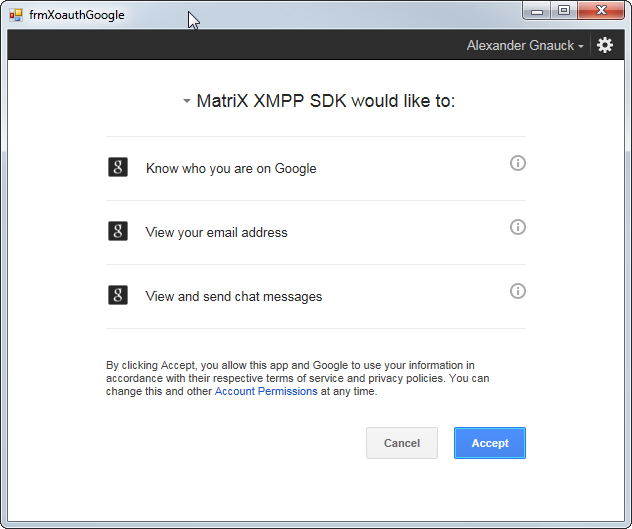
When you run the code you should see the following: google_xoauth2

3) Authentication

When the user now clicks on “Accept” in the authentication dialog the page in the browser reloads. The new page contains an Authentication code in the title tag. The authentication code is also in the body of the result page. We have seen cases where the code in the title tag was cut off. So it could be more secure to parse it from the body.

private void webBrowser1_DocumentCompleted(object sender, WebBrowserDocumentCompletedEventArgs e)
{
    string docTitle = ((WebBrowser) sender).DocumentTitle.ToLower();
    // when there is "success code=" in the title its the page we are looking for.
    if (docTitle.IndexOf("success code=") > -1)
    {
        webBrowser1.Visible = false; // Hide the webbrowser
        // we can find the auth code in the title tag of the html page
        string authCode = webBrowser1.DocumentTitle.Replace("Success code=", "");
        
        ProcessAuthorizationCode(authCode);
    }
    else if (docTitle.IndexOf("denied error=") > -1)
    { 
        // user denied the app dialog, handle this here.        
    }
}

4) Exchanging the Authentication Code

Now we have the Authentication code, and can use it to request the access token and refresh token over a simple HTTP Post. The result is in JSON, we use Newtonsoft.Json to process it.

public void ProcessAuthorizationCode(string authCode)
{
    var postData = new List<string>
    {
        "code=" + authCode,
        "client_id=" + CLIENT_ID,
        "client_secret=" + CLIENT_SECRET,
        "redirect_uri=urn:ietf:wg:oauth:2.0:oob",
        "grant_type=authorization_code"
    };

    //Posting the Data to Google
    string responseString = Post("https://accounts.google.com/o/oauth2/token", postData);

    //Processing the JSON Response
    JObject jObject = JObject.Parse(responseString);
    
    JToken refreshToken = jObject.SelectToken("refresh_token");
    // Checking for errors.
    if (refreshToken == null)
    {
        //this._ErrorMessage = response;
    }
    else
    {
        RefreshToken = refreshToken.ToString();
        AccessToken = jObject.SelectToken("access_token").ToString();
        // close the browser Windows, we are done
        Close();
    }
}

public static string Post(string url, List<string> postData)
{
    var request = WebRequest.Create(url);

    // Preparing the post data
    var toPost = string.Join("&", postData.ToArray());
    byte[] byteArray = Encoding.UTF8.GetBytes(toPost);

    request.Method = "POST";
    request.ContentType = "application/x-www-form-urlencoded";
    request.ContentLength = byteArray.Length;
    var dataStream = request.GetRequestStream();
    
    dataStream.Write(byteArray, 0, byteArray.Length);
    dataStream.Close();
    try
    {
        // read the response
        var response = request.GetResponse();
        dataStream = response.GetResponseStream();
        var reader = new StreamReader(dataStream);
        string responseString = reader.ReadToEnd();
        
        reader.Close();
        dataStream.Close();
        response.Close();
        
        return responseString;
    }
    catch (Exception)
    {
        return null;
    }
}

5) Getting the username (optional)

The username for XMPP authentication for XOAUTH2 SASL is the users email address. You can either ask the user to enter it in your software. Or you can use your access token to request more user details. This is why we have added the scope https://www.googleapis.com/auth/userinfo.email. This allows us to get the username with a post to the following url:
https://www.googleapis.com/oauth2/v1/userinfo?access_token={your_access_token}

This request returns JSON payload where you could fine the users email address.

6) Authenticate with MartiX

Now we have everything to perform the XOAUTH2 authentication with MatriX. We need to subscribe to the OnBeforeSasl event to manual select the SASL mechanism and pass our access token.

private void xmppClient_OnBeforeSasl(object sender, Matrix.Xmpp.Sasl.SaslEventArgs e)
{
  // make sure we use the correct username for authentication    
  xmppClient.Username = "user12345@gmail.com";
  // disable automatic SASL algrithm selection in MatriX
  e.Auto = false;
  // manual specify the X_OAUTH2 SASL mechanism 
  e.SaslMechanism = Matrix.Xmpp.Sasl.SaslMechanism.X_OAUTH2;
  
  //pass the Access token to MatriX  
  e.SaslProperties = new OAuthProperties()
  {
      AccessToken = "AccessToken"
  };    
}

Unity development with MatriX

A question which comes up very often is the following:

Can I use MatriX with Unity 3d?
Of course you can. Many of our customers are using it with great success in their Unity projects.

Unity is based on Mono. MatriX is designed for cross platform and works on all major .NET platforms, including Mono.

Many Unity developers have some problems to get started with MatriX on Unity.
This post should be a small tutorial and address some of the issues you may be facing during your Unity development.

1) Download the correct MatriX dll (Mono build). MatriX builds are not universal, which means you need to download and reference the MatriX library for Mono.
You can get the latest Mono build from NuGet here:
https://www.nuget.org/packages/MatriX.Mono/

2) MatriX requires System.Xml.Linq.dll. Make sure that you reference System.Xml.Linq in your project as well and add it to your assets. Otherwise Unity may throw an exception when you run your project.

3) Depending on your Unity version you may get compiler errors on iOS. When you use the latest Unity version this should be no problem. On older Unity versions this problem is related to obfuscation. To resolve this please contact us directly.

4) The iOS stripping feature causes problems. It does not work when reflection gets used. The core Xml serializing engine in MatriX is build on reflection using a factory pattern. You either have to remove stripping from your complete project, or exclude the MatriX classes.
Here is an example of a link.xml file excluding all MatriX classes:

<linker>
  <assembly fullname="Matrix">
    <type fullname="Matrix.*" preserve="all"/>
  </assembly>
  <assembly fullname="mscorlib">
    <namespace fullname="System.Security.Cryptography" preserve="all" />
  </assembly>
</linker>

It looks like disabling all stripping in Unity is not enough and the link.xml file above must exist.

5) Some of our users reported that connecting to an XMPP server does not work inside the Unity editor because of some networking problems of the IDE. When the code gets executed or published on a device it works fine. This is a restriction of Unity and not related to MatriX.

If you run into any other problems please contact us directly. We do our best to solve them.

Task-based asynchronous MUC room configuration

The question on how to change the configuration of a Muc room, or how to make a room persistend comes up very often in our forums and support enquiries.

Here is a small example using MatriX and the task based asynchronous pattern.

In MatriX most of the Muc functionality can be accessed with the MucManager component. We assume that you are familiar with the MucManager and have joined or created Muc rooms already.

In this small example we want to make an existing room persistent.
Four steps are required to achieve this:

  1. Request the current room configuration.
  2. Parse the current room configuration in code or render it to a GUI.
  3. Create the xdata result, either in code or from the user input in the GUI.
  4. Submit the new room configuration.

Here is the code:

private async void MakeRoomPersitent(Jid roomJid)
{	
	// Step 1, request the room configuration
	var iq = await mm.RequestRoomConfigurationAsync(roomJid);
	if (iq.Type == IqType.result) // only proceed on result
	{
		// Step 2 and 3, parsing the current config and
		// creating the	result is done in the same loop here.
		var xdata = iq.Query.Element<Data>();
		var xDataResult = new Data
		{
			Type = FormType.submit
		};

		foreach (var field in xdata.GetFields())
		{
			var retField = new Field()
			{
				Type = field.Type, // keep the type
				Var = field.Var // keep the var
			};

			// we are changing the muc#roomconfig_persistentroom only
			// other fields get copied only with the existing values			
			if (field.Var == "muc#roomconfig_persistentroom")
				retField.AddValue(true);
			else
				retField.AddValues(field.GetValues().ToArray());

			xDataResult.AddField(retField);
		}

		// Step 4, submit the changed configuration back to the server (room)
		var submitIq = await mm.SubmitRoomConfigurationAsync(roomJid, xDataResult);
		if (submitIq.Type == IqType.result)
			Debug.WriteLine("success");
		else
			Debug.WriteLine("something went wrong");
	}
}

If you want to render Data froms to UI, and generate responses from the UI input, you can use the sources in the MatriX.Ui project which can we downloaded from here:
http://www.ag-software.net/download-directory/

MatriX Screencast #2 published

The 2nd screencast has been published. This tutorial covers the following:

  • installation of a local Openfire XMPP server
  • configuration of the server
  • creating user accounts
  • starting XMPP client development on the local server

More screencasts and tutorials for other XMPP server software is coming.

MatriX XMPP SDK Screencast 2

This tutorial shows how to install you own local Openfire XMPP server for development with the MatriX XMPP SDK

MatriX XMPP SDK Screencast 1

This tutorial shows how to get started with the MatriX XMPP SDK

NuGet package available

Some of our customers asked for NuGet packages. The roadmap of our development is heavily impacted by our customer requests. We are always receptive to your criticism, ideas and praise

When you prefer NuGet for managing your references then you can start using it for MatriX as well now.

You can find the MatriX NuGet package here:
https://www.nuget.org/packages/MatriX/